25 DIY Christmas Tree Stands Plans You Can Make Today (With Pictures)
-
Shea Cummings
- Last updated:

Most people have some generic tree stand for their Christmas tree kicking around. These stands are usually nothing fancy, and more often than not, they’re hidden under a festive tree skirt anyways.
If you’re looking for a fun DIY project for this holiday season, consider building your own tree stand. When you make your own decor, you’re free to inject as much personality into it as you like. And you may be surprised to find how inexpensive it is to make a DIY Christmas tree stand.

The 25 DIY Christmas Tree Stands Plans
1. Farmhouse Christmas Tree Stand by The Stonybrook House
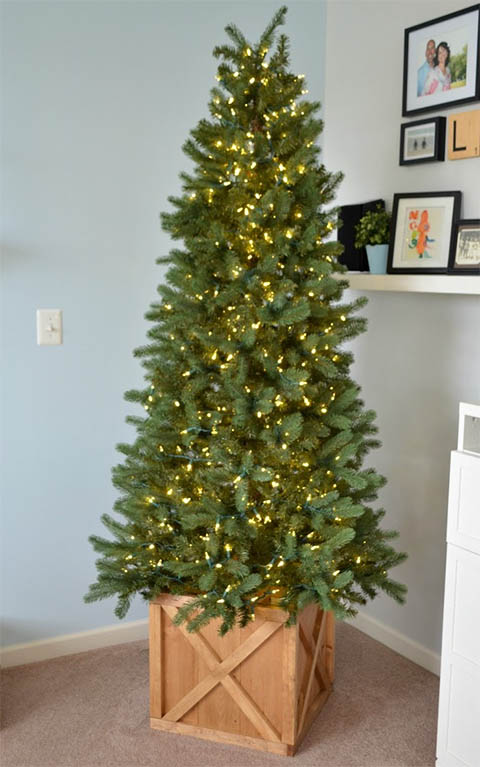
| Materials: | 1×6 and 1×2 pine boards, stain and wood conditioner of your choice |
| Tools: | Nail gun, tape measure, circular saw or miter saw, glue, clamps |
| Difficulty Level: | Intermediate |
You don’t need to use pine boards for this farmhouse Christmas tree stand. However, pine is one of those woods that is great for those farmhouse or barn-style projects, which is exactly what this DIY stand aims for.
The concept for this project is really quite simple. However, unless you already have some DIY knowledge, the plans could be difficult to keep up with in some places. That’s the primary reason we’ve suggested this as an intermediate project. Other than that, this is not a difficult project, and the finished project is highly customizable regarding the color and finish of the stand.
2. Pallet Christmas Tree Stand by Instructables
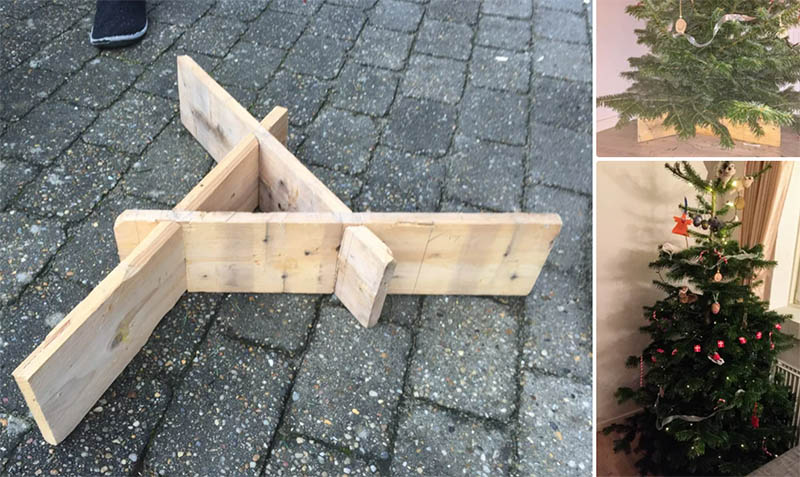
| Materials: | Pallet wood, plastic bag from box of wine, screws |
| Tools: | Miter saw, drill, |
| Difficulty Level: | Beginner |
This pallet Christmas tree stand is the perfect project for someone just dipping their toes into the DIY world. Outside of the box of wine, there is basically no cost to this project. Many businesses allow you to take pallets for free, and most people will have three screws kicking around.
A miter saw will be the easiest tool for this project. However, if you have a circular saw or even a jigsaw, you can make either of those work as well. Sanding the wood and giving it a finish could add to the aesthetic appeal of the stand. But once the tree is up, you could also cover the whole stand in a tree skirt.
3. DIY Christmas Tree Stand by Family Handyman
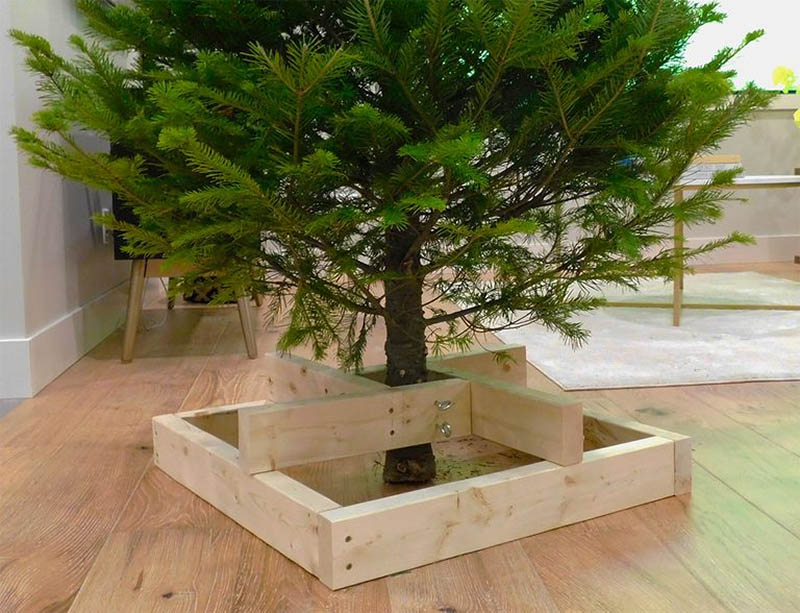
| Materials: | 2x4s, screws, wire eye lags |
| Tools: | Allen wrench, miter saw, drill, |
| Difficulty Level: | Beginner |
It doesn’t get much simpler than this DIY Christmas tree stand. If you’ve done any DIY woodworking projects before, this should take you less than an hour—it probably won’t take even a half hour. And cost-wise, you only need a couple of 2x4s for lumber and some hardware.
This plan is similar to the pallet stand we just covered in the sense that it’s not the most beautiful finished product. It will hold a nice big Christmas tree, though! If you want it to be a little fancier, you can hit it with some paint or stain. Otherwise, cover the stand with a lovely festive skirt once the tree is up.
4. Metal Bucket Christmas Tree Stand by ehow
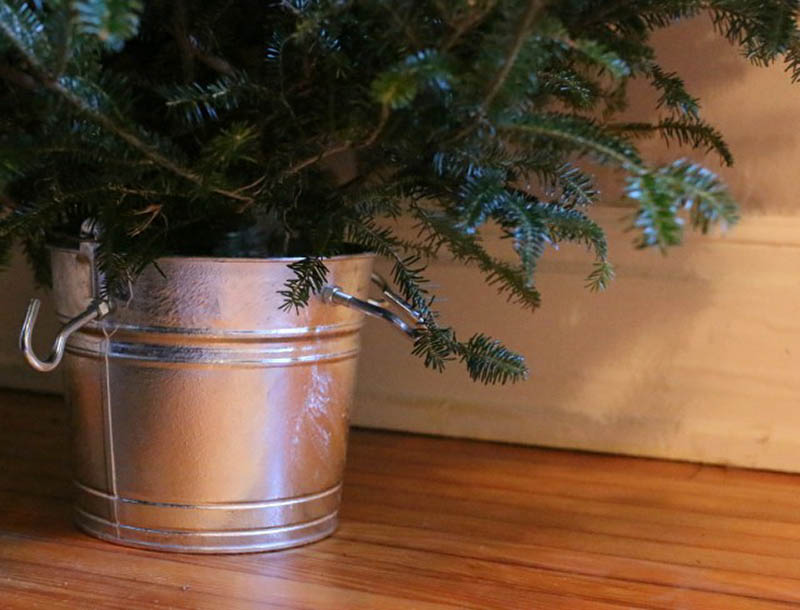
| Materials: | Galvanized bucket, clothesline hooks with nuts, marble rocks or garden gravel, 8-inch round plastic container, drill bits |
| Tools: | Drill, tape measure, |
| Difficulty Level: | Beginner |
Wood isn’t the only material we can work with on our DIY project. This metal bucket Christmas tree stand proves that unexpected materials can make fun decor and practical items. The nice thing about this project is it requires very little tool use, which increases the safety factor.
A simple project like this doesn’t take much to customize. For example, you could use suitable metal paint to color the bucket. Or you could decorate it with festive ribbons to give it a little flair. Either way, this isn’t a project that will break the bank.
5. Christmas Tree Basket by The Turquoise Home

| Materials: | Heavy-duty 2-gallon bucket, PVC pipe and cap, quick-dry cement, round basket |
| Tools: | Saw to cut PVC, level |
| Difficulty Level: | Beginner |
This Christmas tree basket is a super sturdy stand that’s unlikely to topple over—even if the cat starts using the tree as a jungle gym. In addition, it looks absolutely wonderful and gives your festive decor a great rustic feel (depending on the type of basket you use).
The nice thing about this project is that it’s easy to do and requires almost zero knowledge. Some cement-mixing experience would be good, but the bags usually have pretty good directions. Another great thing about this Christmas tree basket is that it’s easily customized just by decorating the basket.
6. Sturdy Christmas Tree Stand by The Modern Life

| Materials: | Planter or bucket without holes, rocks, |
| Tools: | Pruning saw |
| Difficulty Level: | Beginner |
A sturdy Christmas tree stand doesn’t have to be fancy. Take this plan, for example. It uses a bucket and rocks to keep your tree in place. This particular DIY project could be as cheap or expensive as you want it to be.
Other than buying a basic bucket or planter, you could simply go collect rocks. On the other hand, you could spend the money on fancy, polished rocks and buy a nicer planter. Just remember to ensure it doesn’t have holes so you can water your Christmas tree without leaks.
7. Christmas Tree Collar Box by A House We Built

| Materials: | Various dimensional lumber, screws, pre-stain conditioner, gray stain (or personal preference), matte topcoat |
| Tools: | Kreg Jig, drill, measuring tape, miter saw |
| Difficulty Level: | Intermediate |
Making a Christmas tree collar box is a great way to stand your tree up and ensure it takes center stage this holiday season. All while discouraging cats from climbing the tree because of its height.
This isn’t an overly difficult project. However, it uses a Kreg Jig, which not everyone has lying around. It’s possible to complete the project without the jig but creating pocket screw holes makes a much nicer finish.
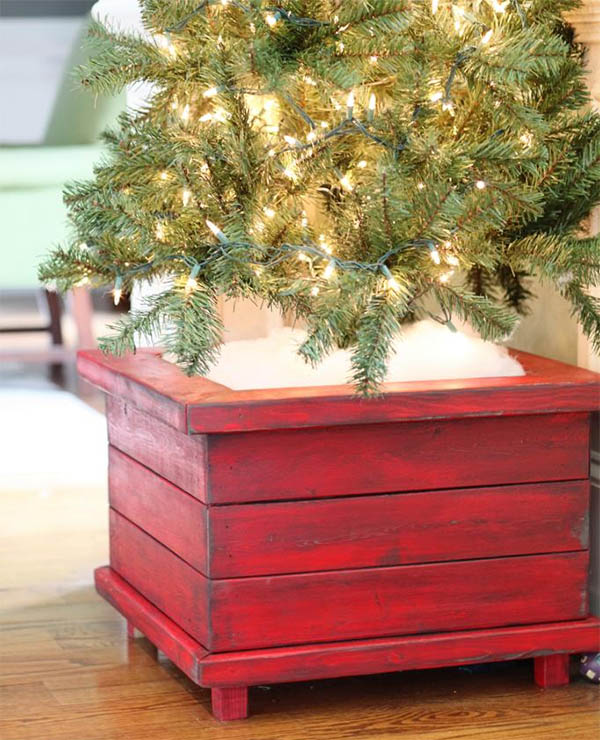
8. DIY Christmas Tree Planter by Bower Power
| Materials: | Dimensional lumber, plywood, screws, glue, stain or paint of choice |
| Tools: | Drill, miter saw, clamps, circular saw, orbital sander |
| Difficulty Level: | Intermediate |
This DIY Christmas tree planter would be a beautiful addition to your family room for the tree this holiday season. Not only does it have a nice rustic feel, but you can also customize it with color to match many different interior decoration styles.
Most of these projects can be created easily with a miter saw. However, to cut the plywood to size, you will need a more mobile saw such as a circular saw or jigsaw. Even a hand saw would do the trick if you don’t mind the extra work.
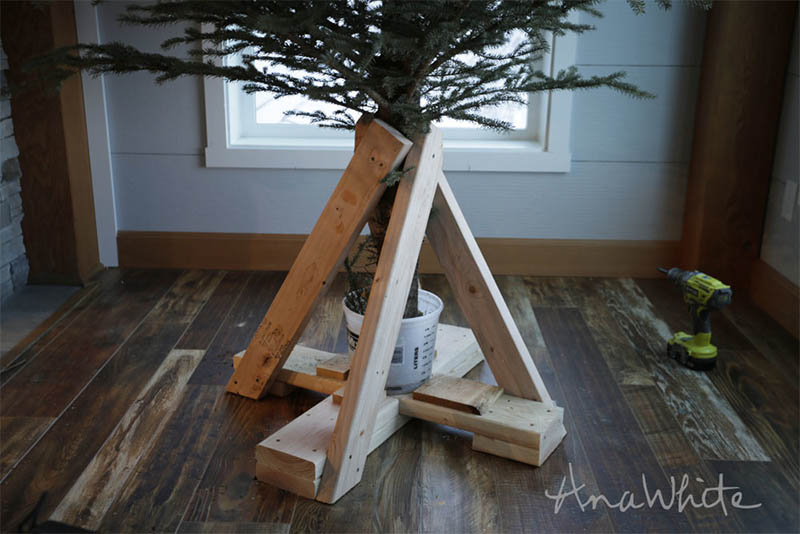
9. Heavy Duty Christmas Tree Stand by Ana White
| Materials: | Dimensional lumber, screws, brad nails, bucket |
| Tools: | Miter saw or circular saw, drill, nailer |
| Difficulty Level: | Beginner |
If you’re not as concerned about looks as you are with the stand being able to hold a big tree, this heavy-duty Christmas tree stand is the project for you. With this project’s design, you’ll be able to put up pretty much as big a tree as any house can hold.
It doesn’t look great, but at the end of the plan, where the creator shows a picture of the finished product, they give a great idea of how to incorporate it. In their house, they wrapped a sheet around the stand and boxed it in with a planter-style box.
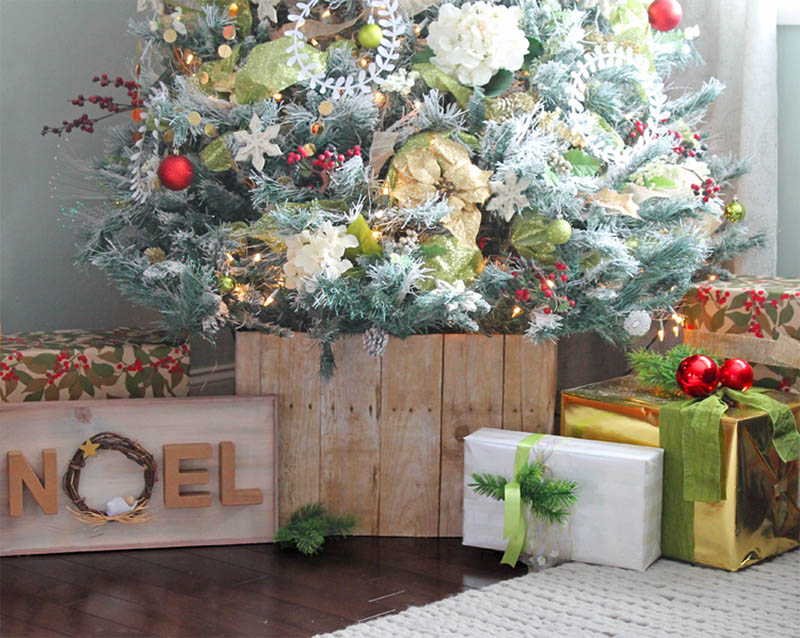
10. Faux Barn Wood Christmas Tree Collar by The Craft Patch
| Materials: | Giant cardboard box, hot glue, binder clip, imitation wood paper, |
| Tools: | Utility knife, hot glue gun |
| Difficulty Level: | Beginner |
Wood is great project material, but not everyone can work on a wooden project. This faux barn wood Christmas tree collar allows everyone to have “wooden” holiday decor. The most expensive part of this project will likely be the imitation wood paper. But the plan’s creator gives several good options for where to get the materials.
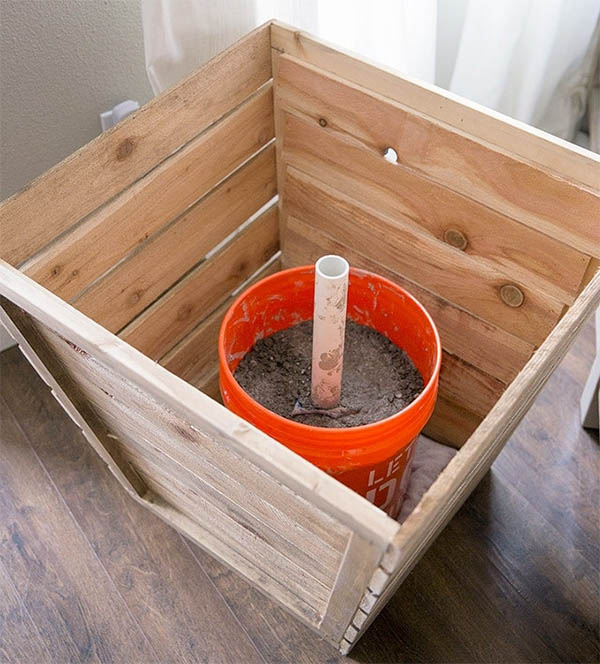
11. Concrete Christmas Tree Stand by Ella Clair & Co.
| Materials: | Bucket, concrete mix, PVC pipe |
| Tools: | Saw for PVC, water |
| Difficulty Level: | Beginner |
Suppose you’re looking for a sturdy stand. In that case, this concrete Christmas tree stand is about the sturdiest you will get without making a heavy-duty wooden one. The nice thing about a concrete stand like this is that you’re free to box it however you want.
Remember to wear a mask when dealing with concrete powder. It’s terrible for your lungs if you breathe it in. Besides wearing the mask, the best way to prevent dust is to ensure you’re using adequate water in the mix.
12. Rope Christmas Tree Collar by A Beautiful Mess

| Materials: | Cardboard, hot glue, white rope |
| Tools: | Utility knife, hot glue gun |
| Difficulty Level: | Beginner |
This is a perfect example of a collar that would pair well with the previous concrete bucket stand. A rope Christmas tree collar is a time-consuming but inexpensive holiday project. Still, the finished project is a unique way of hiding the base of your festive trees.
One neat feature about this plan is that the creator ends the article with some tips on decorations that go well with a white and black rope design.
13. Scrap Wood Christmas Tree Stand by The Kim Six Fix
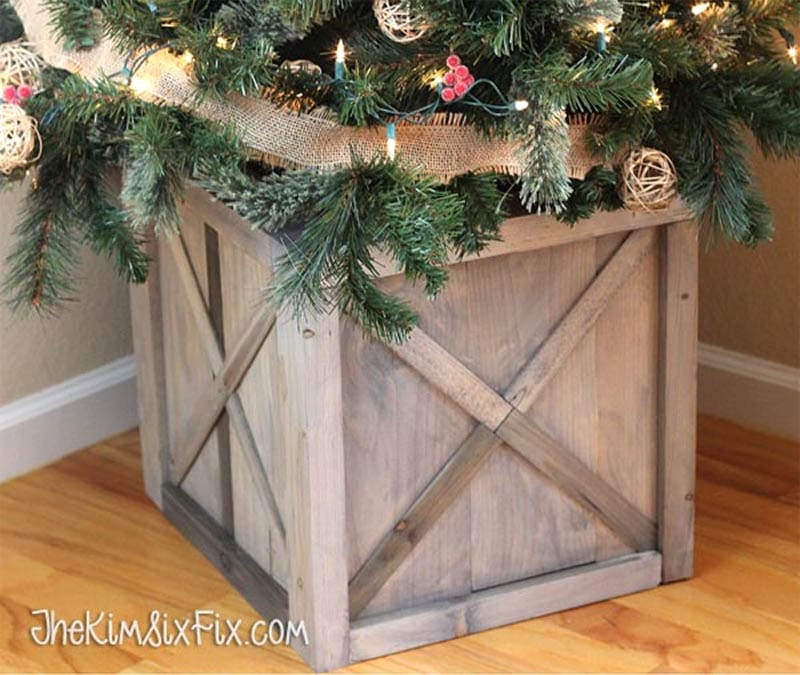
| Materials: | Scrap dimensional lumber, screws, glue, preference of stain or paint |
| Tools: | Drill, miter saw or circular saw, clamps, Kreg jig |
| Difficulty Level: | Intermediate |
It doesn’t get much cheaper than scrap wood, hence the major draw for this wooden Christmas tree stand. The plans show pocket hole screws, which is the ideal way to construct panels like this. However, you can complete the project without a Kreg Jig if you do it carefully.
A nice bonus of this particular design is that the plan’s creator has left it open for customization regarding color. They also include a section to guide you through building a concrete tree stand inside the box if you don’t already have one.
14. Picture Frame Christmas Tree Stand by In My Own Style
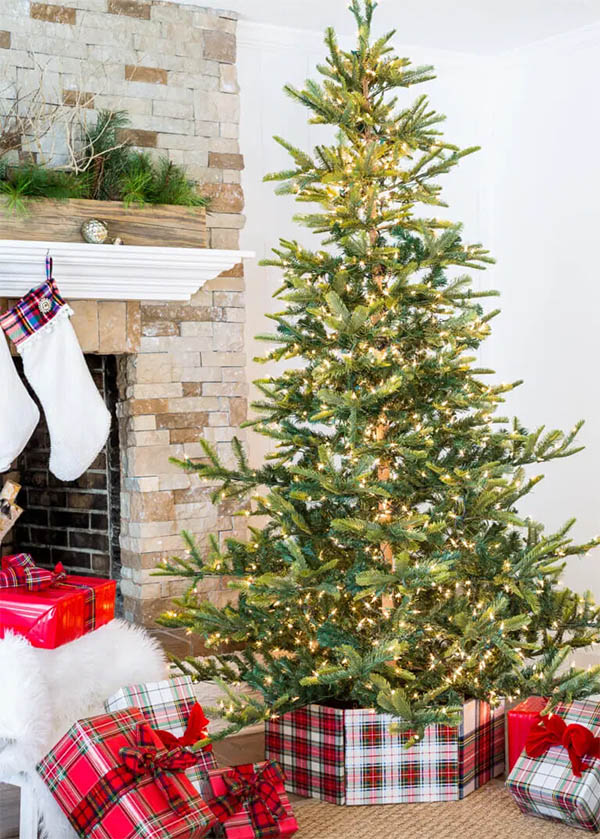
| Materials: | Picture frames, fabric, cardboard, staples |
| Tools: | Stapler, utility knife or scissors |
| Difficulty Level: | Beginner |
If you have extras lying around, this picture frame Christmas tree stand would be a fun holiday DIY project. There are a couple of ways you could approach this project—both are shown in the plans.
You can go the route of using your choice of fabric and cover each frame entirely. On the other hand, you can get creative with the different types of frames and allow each to be a part of the project without covering them.
15. Simple Christmas Tree Collar by Sengerson
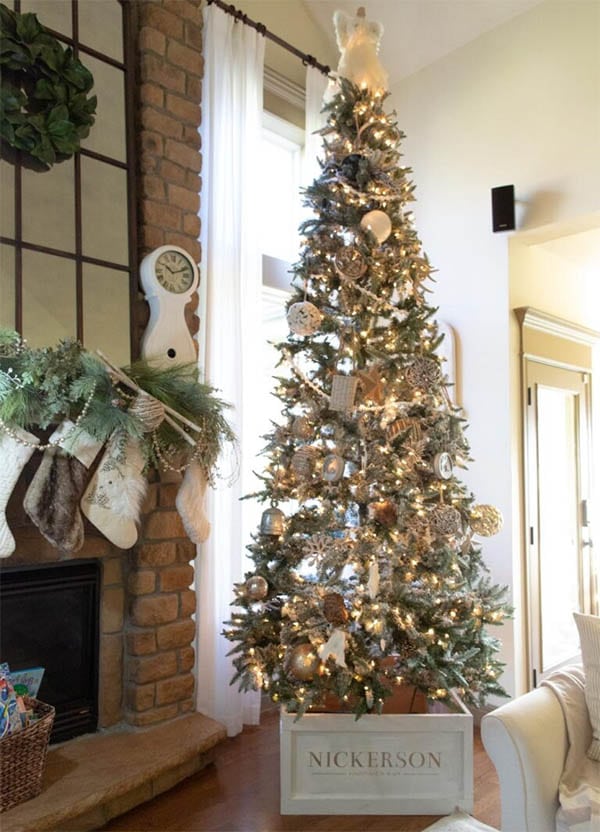
| Materials: | Plywood, trim, preference of paint or stain, staples, screws |
| Tools: | Cricut or similar crafting machine, drill, levels, stapler |
| Difficulty Level: | Intermediate |
This simple Christmas tree collar is easy to do and highly customizable. The creator uses a crafting machine that cuts out decals in the plans. That’s the beauty of this particular project, though. If you don’t have one of these machines, you can easily customize the collar with other decorations to make it your own.
The panel construction is slightly advanced. But as long as you have a reasonable amount of DIY experience, you shouldn’t have any problems.
16. DIY Drum Christmas Tree Stand by Sincerely Marie Designs

| Materials: | Quilting loops, metal flashing, cup hooks, choice of paint, rope trim |
| Tools: | ainter’s tape |
| Difficulty Level: | Beginner |
One of the more unique and original plans on this list is the DIY drum Christmas tree stand. It uses some unexpected materials to get a fantastic result. One word of caution with metal flashing. If you’re not familiar with it, it’s very sharp. So, it’s a good idea to wear gloves.
We’ve labeled this one as a beginner project. However, it does require an artistic flair with tape and painting. If this isn’t your strong suit, you’ll want to take extra time with this project to prevent any mistakes.
17. Tapered Wood Christmas Tree Stand by Ella Claire & Co.

| Materials: | Wooden slats, choice of paint or stain, staples |
| Tools: | Miter saw, stapler, sanding block or orbital sander |
| Difficulty Level: | Beginner |
Wooden tree stands and boxes are awesome, but a tapered wood Christmas tree stand adds a whole new dimension to the project. The creator of this project even includes a handy download of her drawing that shows all the measurements she used, which takes a lot of the effort out of the project.
Of course, you can change measurements and sizes to suit your needs like any woodworking project. Maybe you’ve got a bigger tree, or you want a sturdier stand in the center. The possibilities are endless.
18. DIY Christmas Tree Collar by Home Talk

| Materials: | Galvanized metal tub, toilet bowl cleaner, rocks or bricks |
| Tools: | Steel wool, rubber gloves |
| Difficulty Level: | Beginner |
It doesn’t get much simpler than this DIY Christmas tree collar. It’s as simple as buying the tub and using the toilet bowl cleaner to change the finish. One neat thing is that after using the cleaner to change the galvanized finish, you could also use a stencil and paint to further customize the tub.
After you’re done with the design, all you need to do is weigh the tub down and set up your tree in your new DIY tree collar.
19. DIY Christmas Tree Stand by Bob Vila
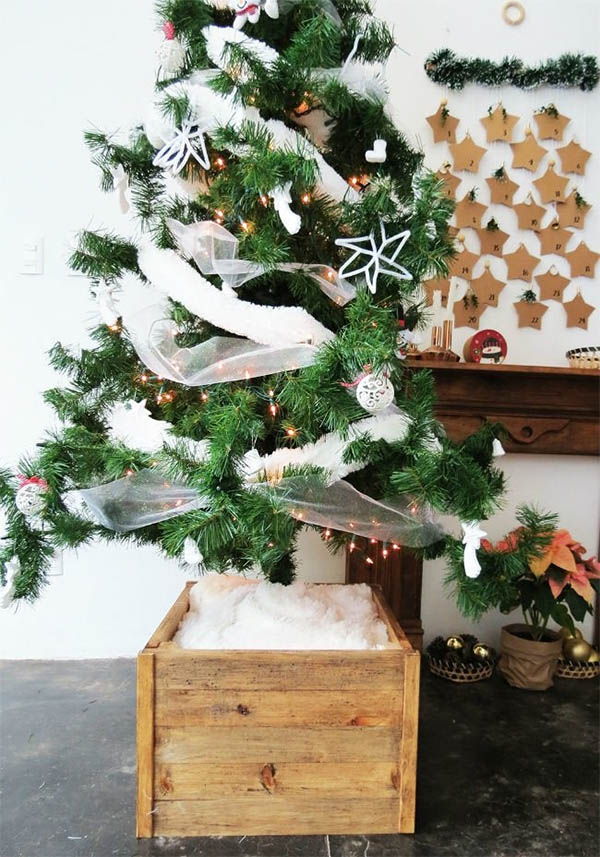
| Materials: | Various types of wood, corner brackets, screws, glue, choice of paint or stain |
| Tools: | Drill, saw, sandpaper, clamps, sander |
| Difficulty Level: | Beginner |
You might just call this DIY Christmas tree stand another box. But it’s another box with endless opportunities to customize. Honestly, there are several boxes on this list, but if you look at each of them, you’ll notice slight design differences. This is where you get to add your own personal touch to the project.
Whether that’s color choice or the way you do the finishing trim. There are no rules for most DIY projects, and this tree stand is no different.
20. Tire Christmas Tree Stand by lollyjane
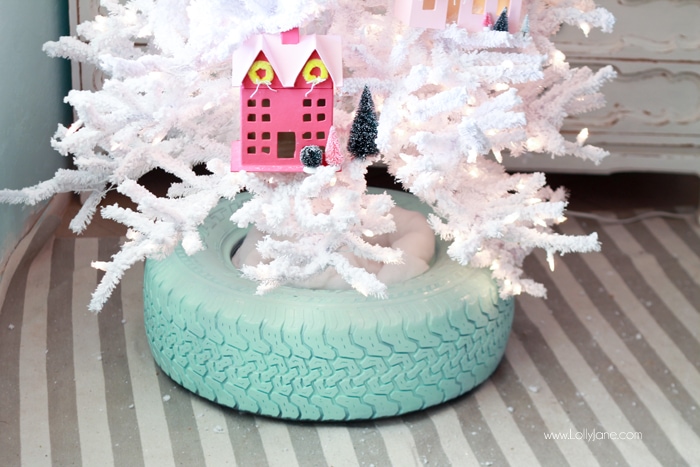
| Materials: | Tire, choice of paint |
| Tools: | Paint brush |
| Difficulty Level: | Beginner |
Making a Christmas tree stand does not get easier than this tire Christmas tree stand. It’s as simple as getting a spare tire, cleaning it, and applying a fresh coat of paint to make it attractive. The tire size will depend on your Christmas tree size—a tree with a large base will require a large tire, and vice versa.
Since this project does not require using any sharp tools, you can enlist the help of your kids to make them feel involved. We’ve classified this as a beginner project because it’s easy and will only take an hour or so.
21. Vintage Tin Christmas Tree Stand by thecrazycraftlady
| Materials: | Tin, a choice color of craft paint, binder clips |
| Tools: | Tape, paintbrush |
| Difficulty Level: | Beginner |
One of the more unique DIY projects is the vintage candy tin Christmas tree stand. It uses old and discarded tins that are readily available. However, you need to be careful not to cut yourself on any rusted parts.
If you want to make this project more attractive and artistic, you can add some colorful tape and Christmas decorations. Whatever you choose to do, it shouldn’t take you more than 20–30 minutes.
22. DIY Burlap Sack Christmas Tree Skirt by dailydoseofdiy

| Materials: | Burlap sack, paint, pool noodle (optional) |
| Tools: | Tape, paintbrush, twine |
| Difficulty Level: | Beginner |
A DIY burlap sack Christmas tree stand adds a farmhouse appeal to the home and may blend well if you have rustic furniture. The size of the sack will depend on the size of the tree and how you want it to look. You can also use burlap to make matching Christmas décor.
The project is pretty straightforward, and depending on the colors and patterns on the sack, you may not have to add decorations. On the other hand, you can get creative with different paint patterns and decorations for a more artistic flair.
23. Knit Christmas Tree Stand
| Materials: | Yarn |
| Tools: | Crochet needles |
| Difficulty Level: | Beginner |
It doesn’t get much easier and cheaper than a DIY knit Christmas tree stand. The only supplies you need is some yarn. The ideal way to make this knit tree stand is by using your hands to make the loops. However, you can use crochet needles if you find it easier.
Holidays and knitting go hand in hand, and this would be a great time to learn how to knit. You can use the remainder of the yarn to knit Christmas decorations such as wreaths and Christmas tree angels.
24. Gift Box Christmas Tree Stand by HGTV

| Materials: | Gift box, cardboard box, your choice of fabric/ wrapping paper |
| Tools: | Scissors, tape |
| Difficulty Level: | Beginner |
If you have an extra gift box or cardboard box lying around, this gift box Christmas tree stand is a fun DIY project. You can do it in two ways—either remove the lid entirely or make a hole in the cover where the base of the Christmas tree will go.
If the gift box is colorful, you can leave it as it is. You can also use your choice of fabric to cover the gift box.
25. DIY Lampshade Christmas Tree Stand by HGTVHandmade
| Materials: | Lampshade, ribbon, paint, thread |
| Tools: | Scissors, glue gun, paintbrush |
| Difficulty Level: | Beginner |
If you are looking for simplicity, this DIY lampshade Christmas tree stand is the perfect project for you. You can use the size of a lampshade that can hold your Christmas tree comfortably. If it doesn’t look great, you can tie a ribbon around it for a classier look.
This is a relatively easy project. However, you need to put a more solid base under the tree stand to prevent water from leaking when you water your Christmas tree.

Conclusion
There you have it: all these different DIY Christmas tree stand ideas to get your creative juices flowing. The beauty of any DIY project is that there aren’t a lot of rules. You can customize anything to your personal taste. We recommend that you read through several different plans that interest you and see how you can combine various elements to get a tree stand that is 100% you!
Featured Image Credit: sincerely-media, Unsplash
Contents
